Fortifying a Galaxy Nexus with stock-ish image and root access

In this post I will describe my recipe to have a Samsung Galaxy Nexus (codename “maguro”) using a rooted factory image, capable of getting OTA updates without loosing root access and with a locked bootloader, keeping the user data safe in case it gets lost or stolen, in the sense that the person getting it will not be able to extract personal details from it like Google accounts, settings, downloaded apps and their data, media, etc.
I assume the reader starts with a stock unmodified factory image, and knows how to use fastboot.
Step 1: Getting root access
The first step is getting root access, to accomplish this the easiest way is to temporarily unlock the bootloader (don’t worry, we will re-lock it later).
Open a shell prompt and type fastboot oem unlock, all data on the phone will be lost as after oem unlock the bootloader performs a factory data reset (also called hard-reset or reset to factory default).
Once the bootloader is unlocked, we can flash “unsigned” data through fastboot, this allows us to flash a customized recovery image, which will allow to flash an usable ‘su’ binary with the proper suid permissions and a superuser app into the system.

There are a few custom recovery images out there to choose from, the most popular being ClockworkMod recovery and TeamWin Recovery Project (TWRP). I recommend the later, because it supports decrypting an encrypted data partition on Galaxy Nexus since version 2.2.0.
To successfully root the device, first flash the custom recovery image using fastboot: fastboot flash recovery recovery-maguro.img, then reboot into recovery without booting the system (this is important, as during boot the recovery image checksum is verified and if it doesn’t match the stock recovery the system will overwrite the custom recovery with the stock one).

Once we’re into the custom recovery, we need to flash the ‘su’ binary and the superuser apk, again there are multiple possibilities out there, the most popular being ChainsDD Superuser (flashable zip) and Chainfire SuperSU (flashable zip).
Finally, when the phone is booted again the stock recovery will be automatically flashed and you will have a rooted phone with unlocked bootloader and stock recovery.
Step 2: Relocking the bootloader
Re-locking the bootloader is important, because with an unlocked bootloader any unauthorized user could access your private data by flashing a custom recovery and backing up or mounting your storage and data partitions. This is why the ‘oem unlock’ process wipes your data, and this is why you should keep the bootloader locked.

The Galaxy Nexus bootloader stores the lock status at position 0x000007C (124 decimal) of the param partition of the device’s internal storage. When the byte is set to ‘0’, bootloader is unlocked, when it is set to ‘1’ bootloader is locked. As you can guess now, if you have root access you can manually change the bootloader status from the system, thus it is possible to unlock and relock it without using fastboot, and without wiping your data. You could do this process manually using ‘dd’, but of course the good folks at XDA have created an open source app to automate this process for you. Install BootUnlocker for Galaxy Nexus from the play store, give it root permissions and re-lock your bootloader now. If you want to have a look at the application source code, check the google code project page.
You now have a rooted phone with stock recovery and locked bootloader.
Step 3: Encrypting the phone
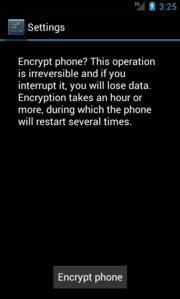
Encryption on Android uses the dm-crypt layer in the Linux kernel, to enable encryption go to Settings, Security, Encryption and click on “Encrypt phone”, for the encryption process to start battery should be fully charged and the phone AC adapter must be plugged in. For more details on how encryption works, read Notes on the implementation of encryption in Android.
Once the phone is encrypted, you need to type a numeric PIN or password to decrypt it each time you power it on. The master key to decrypt the filesystem is encrypted with a hash of the user’s lock screen password (that’s why you can only use pin or password in the lockscreen when encryption is enabled).
Currently, there is only one password for both the encryption and lock screen. This is especially bad because you cannot turn off screen lock and therefore have to type it rather frequently, which makes it easier to get a glance on the screen while typing it. Until Google provides a way to use different passwords for encryption and screen lock, you can manually change password for encryption by issuing the following shell command as root:
vdc cryptfs changepw <new_password>
This command changes only encryption password requested at phone boot. The lock screen PIN or password remains unchanged. Please see (and star) Android issue 29468 for Google to implement this in the UI.

Again, there’s an app for that too! check out Cryptfs Password (github source) if you want to change the password without messing with the command line.
Make sure to choose a good password not based on a dictionary word, as the encryption can be cracked using brute force (see Into the Droid – Gaining Access to Android User Data presentation from Thomas Cannon at Defcon 2012, slide 26 and slide 27).
You have now an encrypted rooted phone with stock recovery and locked bootloader.
Step 4: Keeping root access after OTA updates
When Over The Air updates are applied, the function set_perm_recursive is called from recovery, this removes the setuid bits on the ‘su’ binary and disables your root access after the OTA has been applied.

To prevent this form happening, one could change the file attributes for the ‘su’ binary to immutable using chattr +i /system/xbin/su, again there’s an app that will do this for you automatically (and also keep a backup of your su binary, allowing to “temporarily unroot” your phone): OTA RootKeeper, the source code is available on github.
The same functionality from OTA RootKeper has been recently included in recent versions of ChainsDD Superuser app.
You have now an encrypted rooted phone with stock recovery, locked bootloader and capable of keeping root access through OTAs.
Some notes concerning OTA updates and backups
With this setup, you have not modified any system files so your phone should be able to automatically get OTA updates and apply them cleanly. If you are impatient and want to manually flash OTAs as soon as they are available you should keep in mind your setup is a bit different and instructions posted everywere won’t work exactly for your phone.
To manually apply an OTA update, you should flash a custom recovery first, you can do it either from system using ‘dd’ (you are root now), or through fastboot (but remember to oem-unlock your bootloader first using the BootUnlocker app, and re-lock when done).
To flash the custom recovery from system, you can use the following command as root:
$ su
# dd if=/sdcard/twrp-2.2.0-maguro.img of=/dev/block/platform/omap/omap_hsmmc.0/by-name/recovery
You can then reboot into the custom recovery to apply the OTA from sdcard, or to backup your system, remember to use a custom recovery with support for encrypted partitions like TWRP. Again, remember that when you boot your phone again, the custom recovery will be overwritten with the stock recovery on boot.
Update : An avid reader (thanks Marc!) noticed that factory images don’t include the files /system/etc/install-recovery.sh and /system/recovery-from-boot.p which are responsible of re-installing the factory image on boot when the installed recovery checksum doesn’t match the stock recovery, these files are only present if you have updated through an OTA. This means that if you come from a factory image, you’ll need to reflash the stock recovery manually at the end of the process. To do this first extract the stock recovery from a factory image:
$ tar zxvf takju-factory.tgz
$ cd takju-*/
$ unzip image-takju-*.zip
[...]
  inflating: recovery.img
Then reboot into fastboot mode and flash it using fastboot: fastboot flash recovery recovery.img