Hacking Super Street Fighter II Turbo (Part 2)
In today’s post I will try to illustrate the difference between a RAM cheat and a ROM cheat. RAM cheats usually change the data the game has in RAM, for example the previous post showed how to change the value in a fixed memory address to adjust the game difficulty during gameplay. ROM cheats patch the game’s program code to force the game engine take a different path.
One thing I’ve always wanted to see is the combo messages that appear on the side of the screen when you do a multiple hit combo, but for the combos that the CPU does, which for some reason don’t appear. So, that’s what I’ll show you how to do today: hack the ST rom to see the CPU combo messages, plus some other bonus cheats we’ll discover while getting there :)
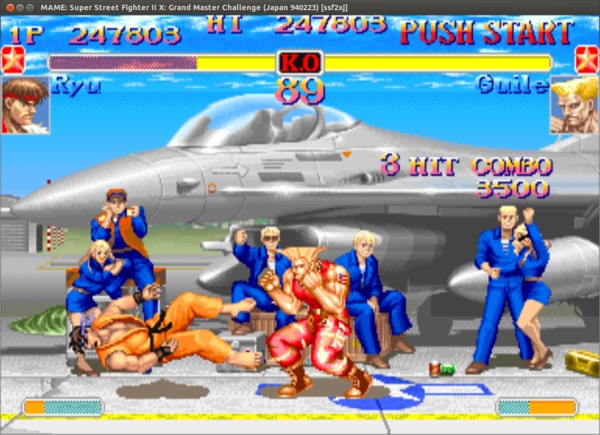
First thing we want to do is locate the memory region or address where the game stores who controls a character, the CPU or a human player. From there, we’ll see where in the code this memory region is accessed, and that should lead us to some point where the game engine decides “it’s a human player so I will show the combo message, or it’s a computer so I will not show it”. What we will try to do is patch that part of the code to make the game engine always show it!
We can start working on the “CPU Combo Messages” cheat using the memdump & diff method we used in the previous example, but we’ll use a different method now just for the purpose of illustrating the possibilities of MAME’s built in debugger: the “cheat” commands.
Start the game with the debugger enabled, and start playing with 2 human controlled characters (P1 & P2). When the “Round 1” message disappears press ENTER in the debugger screen to break, and type the command cheatinit. This will start a new cheat search in memory by remembering the state of all memory addresses at that point. Now return into the game, and start playing with one human player (P1) against the CPU (P2). Ideally that match should have the same characters as the one before, with the same colors, etc… to produce the lesser variations possible in the game’s memory. Now when the “Round 1” message disappears, press ENTER again in the debugger screen and type the command cheatnext decrease,1: this will search for all bytes that have decreased by one since we did the cheatinit. Now we can do a cheatlist to see all the possible memory locations that have changed:
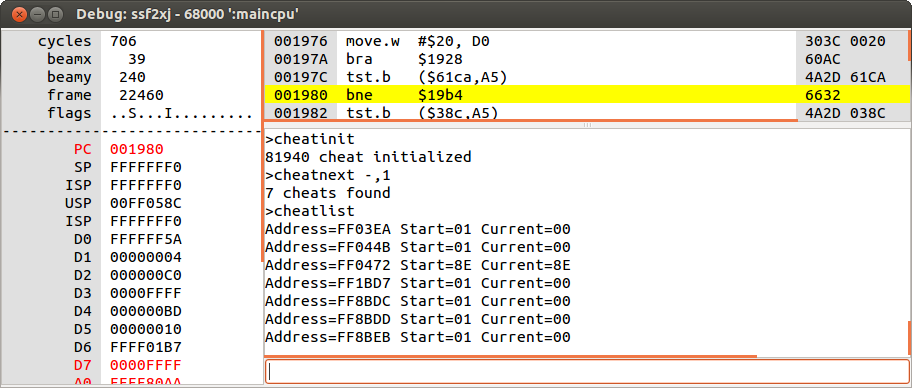
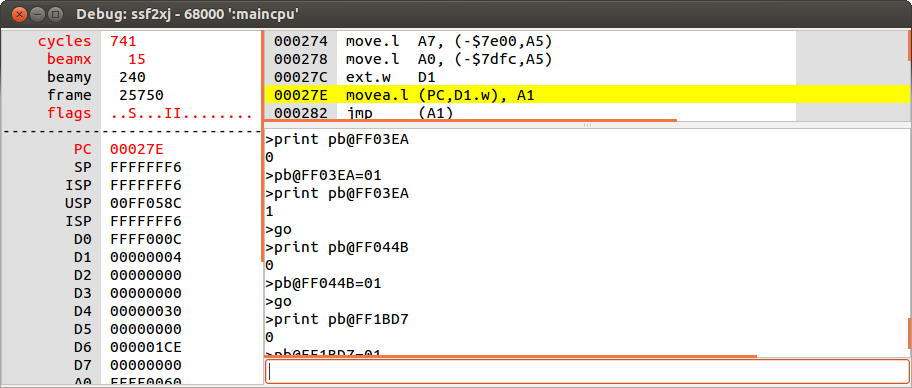
If all went well, one of those memory locations listed here should indicate the game whether the P2 is controlled by a computer or by a human. Now we have to try each one to try to find which is the correct one, there are a few possibilities to do this, you can press ALT+M and change them manually in the memory editor window, or you can change them in the debugger using the command line like this:
But the easiest one is to have the debugger generate a cheat file with all the possibilities for us, using the cheatlist ssf2xj.xml command.
If you are playing against the CPU, you’ll see that immediately after typing the command pb@FF8BDC=01 the CPU stops moving, and you can control the character using the P2 controls. So we have now found the exact memory location that tells the game whether we’re playing against the CPU (memory value equals 0) or against a human (memory value equals 1).
BONUS: we can use that information we have just discovered to write a “Controller Mode” cheat, that should allow us to transfer the control of a cpu-controlled character to a human-controlled character and vice versa. The controller mode cheat could initially be something like this:
https://gist.github.com/10100281
Note that in this cheat I’ve put the address also for P1 (0xFF87DC). You could have used the same method to find it, but it is well known that in Super Turbo ROM the offset for the player 2 base address is 0x400 bytes after the player 1, so to find the P1 address I just subtracted 0x400 to the P2 address we already found using the debugger.
Now it’s time to test the cheat. You’ll notice that you can properly transfer a CPU-controlled character to a human-controlled character anywhere, but when you want to do it the other way round (human to CPU) the game crashes and restarts itself if we are in the middle of a round (you can do it only before starting the match, for example in the character selection screen). We’ll see a possible workaround for that later, but now we can continue to pursue our initial goal.
Let’s go back to MAME’s debugger and put a few watchpoints at the memory address for player one and player two, one will tell us when the memory address is read by the CPU, the other will tell us when the value is changed (write). We will also print the program counter (PC) when the read/write operation occurs, and resume the execution:
wpset 0xFF87DC,1,r,1,{printf "P1 Read @ %X=%X with PC=%X", wpaddr, pb@FF87DC, PC; go}
wpset 0xFF87DC,1,w,1,{printf "P1 Write @ %X=%X with PC=%X", wpaddr, pb@FF87DC, PC; go}
wpset 0xFF8BDC,1,r,1,{printf "P2 Read @ %X=%X with PC=%X", wpaddr, pb@FF8BDC, PC; go}
wpset 0xFF8BDC,1,w,1,{printf "P2 Write @ %X=%X with PC=%X", wpaddr, pb@FF8BDC, PC; go}
With these commands we get the following output during gameplay:
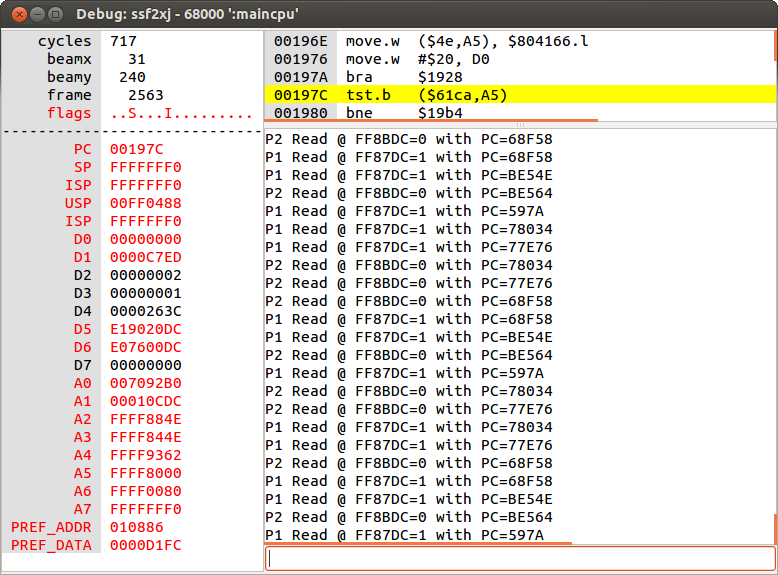
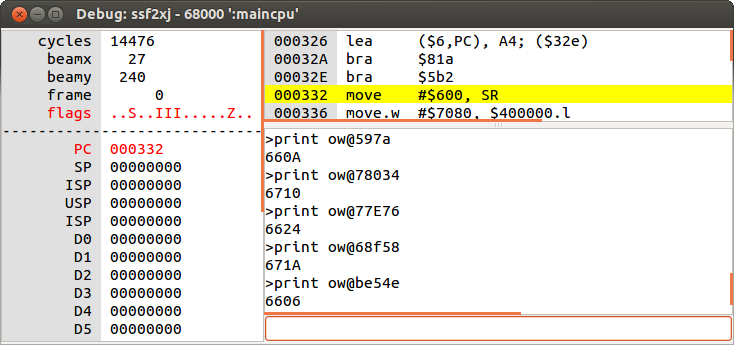
As we can see, there’s a pattern here where the memory position indicating if the character is CPU or human controlled is read always when the program counter is always at the same 6 instructions. We can use bpset to set breakpoints or remove the go command at the end of the previous watchpoints to stop execution when the CPU is at these instructions, so that we will be able to inspect the disassembly. We can also use the debugger’s built-in dasm command to write the disassembled code into a file:
dasm 1.asm,0x597a-20,100
dasm 2.asm,0x78034-20,100
dasm 3.asm,0x77E76-20,100
dasm 4.asm,0x68f58-20,100
dasm 5.asm,0xbe54e-20,100
dasm 6.asm,0xbe56e-20,100
Upon inspection of the disassembled code we can see that we mostly have BEQ and BNE instructions. I’ll explain the basic concepts to be able to NOP an instruction or invert a branch condition using very basic motorola 68000 assembly concepts, which is the main CPU that powers the CPS-2 boards:
- The instruction NOP (no operation) has the opcode
NOP = 0x4e71 - The instruction BEQ (Branch if Equal) has the opcode
BEQ = 0x67XXYYYYZZZZwhere XXYYYYZZZZ indicates how far we will jump forward if the previous comparison instruction (usually a TST) was found to be equal. - The instruction BNE (Branch if Not Equal) has the opcode
BNE = 0x66XXYYYYZZZZwhere XXYYYYZZZZ indicates how far we will jump forward if the previous comparison instruction (usually a TST) was not equal.
So if we need to invert the logic we can change the BEQ for BNE by swapping a 67 for a 66 on the first byte of the opcode, or if we want to always force a certain code path we can just NOP the branch instruction and it will always go to the next instruction right after the NOP’ed branch.
Now that we have this basic mortola 68k code patching introduction, if we just print the opcodes at the locations we have found using the debugger we will obtain the following results:
As we can see, the first byte of every opcode is always 66 or 67, meaning it’s a BNE or BEQ instruction. So we can either NOP, or invert the condition on every of these locations and see what happens during gameplay to get an idea of what the code is doing there. If we want to inspect all the details of the code it is better to use an external disassembler; we can use the command save to dump the decrypted CPS-2 opcodes into a file, and load this file in a regular disassembler like radare2 or IDA Pro.
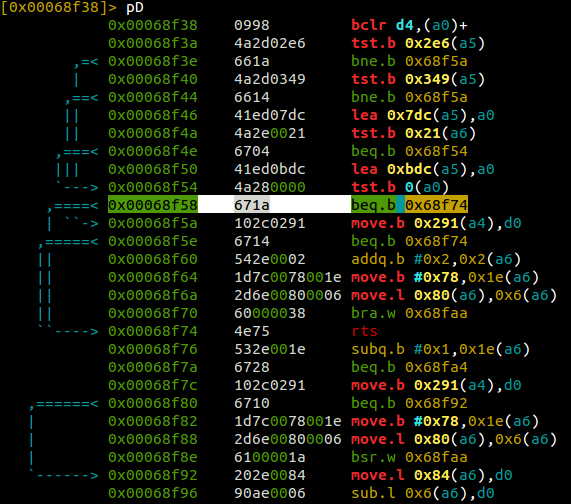
As we can see here (it’s easier to see if we also trace it with the debugger when analyzing the code), the BEQ instruction at 0x68f58 will skip the next 6 instructions if the values in the registers indicate that we’re checking the computer and not a human player. If we skip these instructions, the combo message will not appear, so our goal is not to skip them. If we invert the condition (convert the BEQ in a BNE), the message will only show for the computer and not for the human player, and that’s not what we want. If we want the message to show up always regardless if the character is computer or human controlled, we have to NOP the branch instruction, to make sure the instructions after it will always be executed. The branch instruction at 0x68f58 has only 2 bytes, so to NOP it we just need to enter the command ow@68F58=4E71. Now we’re ready to write the mame cheat for that:
https://gist.github.com/10099906
Remember about the “bonus” controller mode cheat we did before?, it was done by just changing a value in memory (RAM cheat), but now that we know every place of the code where this value is read, we are in disposition to do a ROM cheat for that! So with this simple cheat (again, just NOP’ing an instruction), we can transfer a CPU controlled character to a human controlled character:
https://gist.github.com/10100556
Enjoy :)